|
|

01-15-2012, 10:54 PM
|
|
Banned
|
|
Join Date: Jan 2009
Location: Madill Oklahoma
Posts: 617
Thanks: 0
Thanked 1 Time in 1 Post
|
|
 Paul Rowland 64 P1800 (Project Saint Marie) by Swedish Ops (Special Builds Division)
Here is an introduction to one of our first Customer pay build P1800's. It was
delivered to Swedish Ops (Special Builds Division) by Paul Rowlands from the State of Georgia, and
I must say this is a very solid car. This build will have all of the Swedish
Skunk Werks components including, Suspension, Drivetrain, modern conveniences
and upgrades, but will appear to factory in appearance. We are going with a 375
horsepower LS1 conversion, with a 5-speed standard transmission.
Everything one of the Swedish Ops components is a direct replacement or
bolt on, and everything in this build will be offered in our upcoming Swedish Ops
online catalog. The list of components going into this car is..
Complete New Design front crossmember/Suspension kit with upgraded brakes, rack
and pinion, adjustable ride height and quality.
Complete New Designed Rear End Assembly, featuring a Mod-light 9in rear end,
with disc brakes and Adjustable Aluminum 4 link trailing arms and panhard bar.
New Crate Performance 375 Horsepower General Motors LS1 featuring, Fuel
Injection, Performance Headers, higher fuel efficency, greater service support
and performance.
New Keisler RS600 5-speed Standard Transmission, which features a wide variety of gear
ratios, depending on driving specifications and needs of the driver.
New and Modern Style Air Conditioning, which is will be offered exclusively as a
full kit by Swedish Ops, but will be Manufactured by Vintage Air.
Exclusive Direct Replacement Electronic Guages that will be exclusively offered
by Swedish Ops, and will be offered in a full kit.
Performance all Aluminum Cross Flow Radiator with a direct mount Electric
Cooling Fan Option.. This is being manufactured by BeCool Radiator exclusively
for the Swedish Ops Catalog, and is a direct replacemnt radiator for the
Original Powertrain, or our LS Conversions.
We are still discussing the possibility of Project Saint Marie using Classic
Auto Glass Innovations Flush Mount Glass Kit, so it may also be a feature to
this build. There are many more features that will appear on this build, but
Paul and Stephanie opted for an original style appearance, so it will not be
showcasing all the Swedish Ops products.
The interior will be original in style and appearance, which is very stylish in
its original form.
Here is a bit of History and Expectations of the car from Mr Paul Rowlands.
I purchased Saint Marie in 1998 I think. She was an original Macon Ga sold
car, sold in early 1965 and hence the title shows a 65 even though the serial of
11673 was made in 64. When I brought her home to meet my other two Volvos which
we had of course named as well, we considered names and came up with Saint
Marie. Saint for obvious reasons, Marie for unknown reason! Just sounded right
at the time.
When I bought her she was running and of course finicky with her choke and I
threw tires on her from Sears (165 series that you see on her now) and I drove
her around town and to my office once in awhile. She had a noise here and there
and the dealer installed factory AC never did work so she was not to be driven
in the heat of summer. She was always a head turner and we could never go
anywhere without hearing either; "what kind of car is that?" or "My xxxxx had
one of those waa-aaay back when!" People were usually enamored with the classic
sporty look.
It was late 2005 that she didn't want to start and I found compression very
very low in one or two cylinders. There was no appreciable wear in the cylinders
and I probably could've just thrown her back together and run her since it
turned out to be stuck rings from sitting too much. I could not find a rebuild
kit for the B18 and would've had to punch it out to a B20 to rebuild it
properly. I figured it would be best to go ahead and completely restore her and
I started my parts buying spree and amassed a wealth of parts to try and make
her OEM whole again. I figured I would address the engine issue when the time
came.
In 2006, my wife, Stephanie Reese, and I also began our project of building a
cabin in the mountains of Sevierville, Tn near Pigeon Forge. I designed a
"little" 3500+ sq ft cabin and we spent the next 1 ½ years acting as a General
Contractor to our custom home builder. This took priority over our project Saint
Marie. We finished the cabin in late 2007 and began enjoying the fruits of our
labor as many weekends a month as possible. In the meantime, I tried to spend as
much time on Saint Marie as I could but I also had some medical problems that
prevented me from doing a lot of the mechanical work I have always done to my
personal vehicles. Ruptured lumbar discs and hard work do not go together!
I pulled Marie up on my car hauler trailer and dreamed of the day I would be
able to deliver her to someone who I could trust to restore her to the standards
I expected of myself. Fast forward to this year and my discovery of Swedish
Skunkwerks, Robert Jackson. After watching Robert's project and approach to his
own 1966 P1800 and speaking to him at length about the possibilities, I came to
the decision my wife had been waiting on for the last 6 years. I had found my
restoration partner and it was a done deal in my mind.
Off to Oklahoma with the little Saint and I am looking forward to the finished
product. Alas, I shall not have to worry about punching the B18 out to a B20 and
a finicky choke is no longer a concern either. Saint Marie will be packing 375hp
from an LS1 V8 and a 5spd manual transmission instead of 4 spd with electric
overdrive.
In the end, Stephanie will be the daily driver of the Saint Marie and she is
excited about that. Her only requirements are that Marie remains a P1800 from a
visual standpoint inside and out. As long as no one can tell, without a trained
observation, that she is a classic Volvo P1800, Stpehanie is happy. However,
when Stephanie wants to push the old gal, she will be ready to run. I am also
installing a good Escort Redline radar detector and ZR4 laser jammer since the
little red Volvo will be a perfect target for the law!
Here are some pictures of Saint Marie, which shows the great condition of the
car.. I am not sure what year the first pictures were taken, when it appears in
a running state..


|
01-15-2012, 10:55 PM
|
|
Banned
|
|
Join Date: Jan 2009
Location: Madill Oklahoma
Posts: 617
Thanks: 0
Thanked 1 Time in 1 Post
|
|
I have been asking about our Body Stipping procedures, and we have different plans of attack on that. It really depends on the car and customer preference.. Soda Blasting, Sand Blasting and Dipping all have Pro's and Cons..
Dipping, is really hard to neautralize the acids in the inner structure and crevises, so I dont do that one at all.
Soda Blasting has some of the same issues as dipping when it comes to neutralization of the soda. Vinegar and Water solution and other solutions will neutralize it, but again it is hard to get it all out.
Sand Blasting is way too harsh if your guy doesnt know what they are doing.. It can generate alot of heat and pressure, which causes warpage. We do blast the hard to get area's like the jambs and window channels.
So if we have a fairily solid car, and the materials on the car arent out of hand, we like to strip it by hand. It is alot more work, but you can avoid alot of potential problems later.. If we see areas that need a bit of extra attention, we will blast those areas for sure. All the window channels, door jambs, inner grill, etc, will be lightly blasted, we just dont like working on large panels with the blasting if it can be avoided. Would rather put a bit more effort in stripping, then cause more work and the need of more materials later.
Here are some preliminary naked pics of Saint Marie. Being it is a daily driver, we are not going to completely strip the bottom of the car.. We are going to take off all that is loose, repair any issues, and re-coat the bottom with a newer modern coating..
Of course there are some issues here or there after stripping, but this car is very solid in all the right places.. We had a bit of patch work here or there, but luckily none of it was in any boxed area's, so the back side of the repairs can be sealed up also. After we get all the repair area's tacked in, we will do all the finish welding and grinding to remove any holes are pits.


 Here is some of the basic rust repair, I really think we are getting off luck with this bit. Mr. Rowlands also wanted the side bullet marker lights removed, so we are welding them up also.. There was some holes drilled from previous repairs, and they will all be welded in also. The finish welding on the patches hasnt been done yet, but the pits and pin holes will be completely filled in, and sealed from the back side.


 The drivers fender was previously replaced, and not done to well. The previous repair screwed the fender at the A-Pillar and lower Rocker, these will be removed and welded properly. Also, we will have to address the welding of the fender below the windshield on the cal panel, because it is warped and way too low. If we dont cut it loose, and redo it, there will be WAY too much filler in this area and potential problems later.. It needs to be cut loose and hammered out properly, then re-welded
 If you look at that spotting on the door and other area's, you can see where the corrosion was starting behind the filler. This is why it is extremely important to take the car down to metal and seal properly before body work begins. The older materials, just didnt have the sealing capability of today. So even if you use the best material over the older materials, you will still have issues later.


|
01-15-2012, 10:57 PM
|
|
Banned
|
|
Join Date: Jan 2009
Location: Madill Oklahoma
Posts: 617
Thanks: 0
Thanked 1 Time in 1 Post
|
|
|
01-15-2012, 10:58 PM
|
|
Banned
|
|
Join Date: Jan 2009
Location: Madill Oklahoma
Posts: 617
Thanks: 0
Thanked 1 Time in 1 Post
|
|
Here is an update on Project Saint Maries body work.. I will have the car back
at my shop for suspension, motor, and trans fitment in the next couple of weeks.
I like to get restorations up to atleast the second parts alignment and blocking
stage before I get to heavy into the other work.. By doing this, you allow time
for the primers, glazes, and sealers to cure out properly while you are doing
other work necessary.. Alot of builders will get all the fab stuff done first,
and get the car running, before they start on the body work.. Then once they are
to that body work stage, they get it done with out necessarily think about cure
time and material shrinkage.
There was alot of hammering and pulling to the body here or there, but it is
much better to get all the low areaa you can get out, rather increase the filler
thickness.. There is really nothing wrong with larger blending patches, versus
thicker smaller patches.. Larger thinner patches will actually flex with the
body and cause no issue.. It isnt until the filler gets past a certain thickness
it loses its flexibility property's and will potential problems.
As you can see in some of the pics, guide coating is very very important. We
will guide coat and prime several times before final blocking, just to ensure
the body lines and panels line up and blend properly. The even during final
blocking, we will guide coat a few more time.. It really helps to find any low
areas, warpage, or imperfections you cant see due to the dull finish of the
primers.. So many times the body work looks great in the primer stage, but once
you add the gloss paint to it, all the imperfections stand at attention.
We will be addressing the bottom of the car and engine bay, once the car has had
all the suspension and drivetrain components fitted. After that is done, the car
goes back to the body shop for final blocking and paint work. Then it will come
back to the shop for final assembly.. Alot of People dont realize, you will
actually build and disassemble the car several times over during the process..
The car will be painted in peices to ensure coverage of all areas..


|
01-15-2012, 10:59 PM
|
|
Banned
|
|
Join Date: Jan 2009
Location: Madill Oklahoma
Posts: 617
Thanks: 0
Thanked 1 Time in 1 Post
|
|
Well, Saint Marie made it the 7 miles back to our shop.. She is really in the 2nd blocking stage right now, but that is the perfect time to do Suspension, Rear End, Drivetriain fitment, along with the rest of the parts fitment like the trim and accessories, etc... While we are doing all of that, the first stages of bodywork and sealers have time to cure out before we add more sealers and primers to be blocked out. The final paint stage will lock in harmful reactions and shrinkage, if you dont give enough breathing time, so it is best to space everything out in the proper order...
We will also be installing the door and trunk weatherstrip, to insure there are no issues with sealing or not letting parts like the trunk fully close for a flush fit.. I am sure we have all seen the cars that had nice body work, but once the weatherstrip is installed, it has panels like the trunk held up too high. I like a true and flush fit, so it worth the time to work with these items before paint... After we sort that out a bit, the door/trunk/hood gaps will be evened out via welding or grinding. I dont think I have seen any of these cars with uniform gaps, but this car will have them, along with flush shutting doors/trunk/hood. There is a bit of work to be done on the lower doors to Rocker Panel gap, but again, we have to wait till the car is on the ground and weatherstrip is in.


|
01-15-2012, 11:00 PM
|
|
Banned
|
|
Join Date: Jan 2009
Location: Madill Oklahoma
Posts: 617
Thanks: 0
Thanked 1 Time in 1 Post
|
|
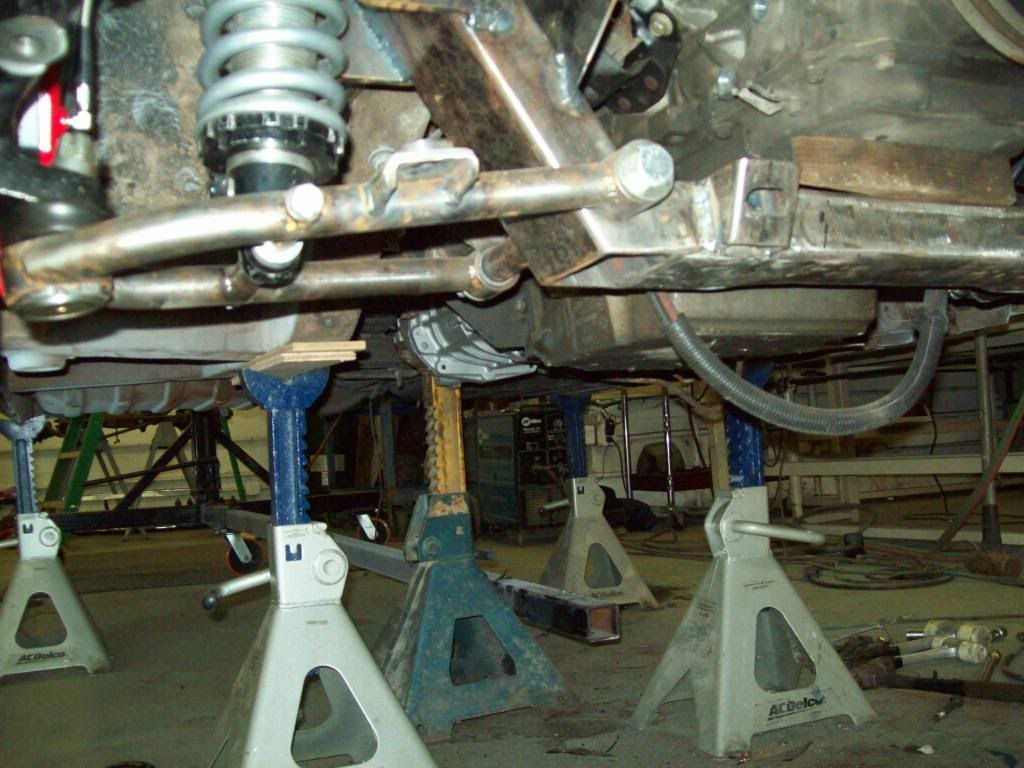
Been a fairly busy day today, I got the Mock Up Ls1 and Keisler Rallye Sport 5-speed in the car today. And made sure we are going to have clearance for the Dual Core Aluminum Radiator and Puller Electric Fans. The motor sits nice and low to ensure the center of gravity wouldnt be affected, but not affect ground clearance. The oil pan actually still sits above the rocker panels, so we should be able to run these things at what ever ride postion we desire.. The transmission also sits nice and tight to the body, so ground clearance there will not be an issue at all. The Motor is also in a position where the performance and handling should be great, and just to be sure, I will have the weight distribution measured before hard weld everything. A half inch here or there can make a difference, and now is the time.
Swedish Ops is working on a pre-fabbed or some sort of easy firewall mod kit for these applications, but I am not sure if we will make them available on the market. We should have them in stock for our Special Builds Department cars, incase someone wants to possible get one.. This would be strictly on a case by case basis...
I still have to set the Drivetrain running angle before I build the LS engine mounts and transmission crossmember. With the drive train in it current position, all the engine service is easy, and you can replace the starter and oil filter with no issues at all. Altenator and the Ac Compressor will drop out the bottom with ease also, so I dont think it is going to get much better than that.. I still have a couple of things to sort out, but all and all, it looks like it is going to come together and service nicely.
Please keep in mind, these are the preliminary rough in pictures, nothing is finished out or dialed in.. Yes, I know the radiator is too high, I put it there to ensure I have electric fan to water pump clearance no matter the engine position.
Also, this is not the actual motor being used, we have a New Crate LS1 for the build, but I like to keep them clean for final assembly, that is why we use a fully accesssorized take out motor for mock up. Just wait until you guys see the engine and engine department covers Swedish Ops (Special Builds Division) will be using to clean and updated everything under the hood.


Last edited by Iamtheonlyreal1; 01-17-2012 at 05:22 PM.
|
01-15-2012, 11:01 PM
|
|
Banned
|
|
Join Date: Jan 2009
Location: Madill Oklahoma
Posts: 617
Thanks: 0
Thanked 1 Time in 1 Post
|
|
Here is a version of the Swedish Ops Front End Kit that this build will be getting, I will have Paul finalize the color combination after set up is completed.. This is a base kit with the standard 11 inch brakes and powder coating option. The Powder Coating option has alot of colors and combinations possible, so there really isnt a limit to your custom application This kit comes fully assembled as pictured above, so the guess work is gone. We have alot of options with brake upgrades up to the 14 inch Wilwood pictured above, along with coil over options, steering options (Power, Non Power, LHD or RHD), etc.. The Adustable Bumpster is standard on all of our kits, which offers specific dial ins if desired.
We have gone through the trouble to make our own custom washers and hardware, because I didnt want the bargain bin washers that dont fit properly. I like things to be proportional, and other kits I have ordered supplied generic washers that were not proportional to the bushings or application..


|
01-15-2012, 11:02 PM
|
|
Banned
|
|
Join Date: Jan 2009
Location: Madill Oklahoma
Posts: 617
Thanks: 0
Thanked 1 Time in 1 Post
|
|
Here are a few pictures of the Swedish Ops universal rear end assemblies.. These rear ends will bolt directly to your Early or Late P1800/Amazon with no body mods or cutting. You also have the widest range of gear ratio and traction options possible, along with 11 inch rear disc brakes which is upgradable to a 12.19 inch, 13 inch, and 14 inch option.
It is fully capable of using your factory coil spring, along with the factory style shocks, but has a rear coil over conversion option for a wider range of adjustment.. With the coil over conversion option, you have a wide range of Spring Rate Options and Coil Over Ride Dampening and Rebound Control settings for precision set up to your preferences.. Also with the coil over conversion option, you have multiple Quick Adjust Ride Hieght Positions from stock to 5 inch drop capability, while allowing the rear axle to sit in the proper alignment position at any range. This constant axle postion is possible due to the Aluminum Adjustable Rear Trailing Arms/Panhard Bar, because it allows a quick turnbuckle style adjustment to set the rear ends postion from right to left, front to rear, along with pinion angle.
The rear coil over conversion kit is made to work with the factory Volvo rear axle assemblies also..It is all a direct bolt on with no cutting. The previous owner cut the spring pockets on the outside, so that is not necessary at all.. In order to get the full adjustablility of the rear end, and proper alignment for lowered car, you have to use the Adjustable Aluminum Trailing Arms/Panhard Bar.
If you look at the pictures also, you will see that 3 different possible mounting position for the Panhard bar on the rear axle, this allows you to keep the optimum bar postion in all the ride height positions.


 Here are some pics of some of the quick adjustability features this axle assembly comes standard with. 3 different mount postions for the Rear Panhard Bar, and 2 rear axle drop for the Coil Over option.. There is another 3 inch of adjustment for the rear ride hieght built onto the Coil Over Mounting cross bar that give you a range of adjustment from stock to a 5 inch drop at 1 inch increments.


|
01-15-2012, 11:03 PM
|
|
Banned
|
|
Join Date: Jan 2009
Location: Madill Oklahoma
Posts: 617
Thanks: 0
Thanked 1 Time in 1 Post
|
|
Here are some preliminary pics of the Swedish Ops rear coil over conversion kit we will be using on this build and others we have going on also.. We are adding a Punch Hole finish plate to the bottom opening near the spring pockets, and few other asthetic features, along with finish grinding and full powder coating. This is a bolt in bar that transfers ALL the LOAD back to the original spring pockets.. It is self centering, and will bolt in with out removing the rear axle. We have the Bolt On adapter brackets to convert your original Volvo rear end coil over to accept the coil over mounting..
This bar give your P1800/Amazon up to 5 inches of incremental ride height settings, from stock to an extreme lowered position. You also have quick adjust ride sensitivity and stiffness settings, with a twist of a knob. We have about unlimited spring load and rate options, so no more settling on what you are looking for in ride height or ride quality. You have the same ride potential at any ride height you choose.
The rear end pictured, is the Swedish Ops Universal Direct Bolt In rear end. It comes with all the gear ratio and traction options you can ever need, along with a disc brake range of 11in to 14 inch rotors and up to 6 piston Calipers. The aluminum adjustable trailing arms/panhard bar allows you to keep your proper rear end alignment and and pinion angles, no matter the ride height setting.. Another unique feature to this rear end is, it comes in a 54in, 55in, and 56in track width, which will allow you to use a wider variety of common wheels and offsets with out spacers.


|
01-15-2012, 11:04 PM
|
|
Banned
|
|
Join Date: Jan 2009
Location: Madill Oklahoma
Posts: 617
Thanks: 0
Thanked 1 Time in 1 Post
|
|
|
 Posting Rules
|
You may not post new threads
You may not post replies
You may not post attachments
You may not edit your posts
HTML code is Off
|
|
|
All times are GMT -5. The time now is 07:20 PM.
|


 Brian Hobaugh SCCA National Tour June 2014
 First Hemi 'Cuda Convertible Ever Built
 Short clips: Goodguys Pleasanton autocross and pit videos


 Linear Mode
