...

Go Back   Lateral-g Forums > Lateral-G Open Discussions > Project Updates
User Name
Password


Reply
 
Thread Tools Display Modes
  #91  
Old 05-03-2016, 03:18 PM
SBDave SBDave is offline
Senior Member
 
Join Date: May 2009
Posts: 240
Thanks: 0
Thanked 1 Time in 1 Post
Default

My best guess is they save around 4 lbs per steering arm and around 1 lbs per hardware setup. That saves you 5 lbs per side or 10 lbs total.

Maybe this change also allowed them a different tie rod design that saved another 0.75 lb per side. That'd be 11.5 lbs total.

These are total guesses but that doesn't seem unreasonable.
Reply With Quote
  #92  
Old 05-03-2016, 04:28 PM
Vince@Meanstreets's Avatar
Vince@Meanstreets Vince@Meanstreets is offline
Senior Member
 
Join Date: Nov 2004
Location: Bay Area, California
Posts: 5,466
Thanks: 13
Thanked 18 Times in 12 Posts
Default

or it was a rough estimation or maybe a typo? Who knows for sure.
__________________
MEANSTREETS PERFORMANCE

Dealer for
ACCUAIR rideheight control systems
ENTROPY RADIATORS XXX radiators for your pro-touring vehicle
FORGELINE MOTORSPORTS Highline custom 3 piece wheels
WEGNER AUTOMOTIVE Custom engines and LSX drive systems
SPEEDTECH PERFORMANCE Bay Area stocking dealer

NEVER FORGET -11
Reply With Quote
  #93  
Old 07-29-2016, 04:25 PM
grendel grendel is offline
Lateral-g Supporting Member
 
Join Date: Dec 2012
Location: NH
Posts: 753
Thanks: 0
Thanked 1 Time in 1 Post
Default

Funny thing, I just don't care.

I want them to build my new arms. Cause I have the same and bump steer all over the place. Trying to get a real alignment's a boat load of fun, too.

Rock on with your bad self!
__________________
My garage builds, with some hack and professional love thrown in:

68 GMC C1500
Haulin more than the mail

73 Camaro
Better grow a mullet

70 K5 - 4wd turned 2wd
Project might as well...

Known as John or "JJ"
Reply With Quote
  #94  
Old 07-30-2016, 05:56 PM
dinos67's's Avatar
dinos67's dinos67's is offline
Senior Member
 
Join Date: Jul 2007
Location: arizona
Posts: 150
Thanks: 0
Thanked 0 Times in 0 Posts
Default Shop work

Car looks amazing very similar to what Desold design in Texas did on the 68 Camaro!
Reply With Quote
  #95  
Old 10-14-2016, 04:27 PM
Flash68's Avatar
Flash68 Flash68 is offline
Moderator
 
Join Date: Sep 2005
Location: NorCal
Posts: 9,145
Thanks: 58
Thanked 158 Times in 104 Posts
Default

Terry & Crew,

Any updates on this one?
__________________
2004 NASA AIX Mustang LS2 #14
1964 Lincoln Continental
2014 4 tap Keezer
Reply With Quote
  #96  
Old 10-24-2016, 04:29 PM
modernbeat's Avatar
modernbeat modernbeat is offline
Member
 
Join Date: Nov 2009
Location: Dallas, TX
Posts: 22
Thanks: 2
Thanked 0 Times in 0 Posts
Default

Quote:
Originally Posted by Flash68 View Post
Terry & Crew,

Any updates on this one?
Terry has been buried in work and the forum updates unfortunately take a backseat to current production.

BUT, you can follow the gallery to see updates. New photos are added every time we complete another task.

https://vorshlag.smugmug.com/Project...ring/i-wW8hfbk


__________________
Jason McDaniel - Vorshlag R&D
Reply With Quote
  #97  
Old 10-24-2016, 05:53 PM
Flash68's Avatar
Flash68 Flash68 is offline
Moderator
 
Join Date: Sep 2005
Location: NorCal
Posts: 9,145
Thanks: 58
Thanked 158 Times in 104 Posts
Default

Thanks Jason. You guys are coming along.
__________________
2004 NASA AIX Mustang LS2 #14
1964 Lincoln Continental
2014 4 tap Keezer
Reply With Quote
  #98  
Old 12-03-2016, 02:46 PM
Fair Fair is offline
Senior Member
 
Join Date: Mar 2014
Location: Plano, TX
Posts: 160
Thanks: 6
Thanked 67 Times in 33 Posts
Default

Project Update December 1st, 2016: We've been plugging away on the 69 Camaro track car - a project that still doesn't have a name yet - throughout 2016, at a pace dictated by the owner. My last post was in April that caught us up to December 2015 work, but I've been scrambling to keep up with forum project threads, as we have about a dozen threads for cars we're tracking, updating, and working on. We also just wrapped up our best month of November ever, inside of our best year (to date) in 12 years of business, so its been bonkers around here


The picture above shows the Camaro a bit beyond where this build thread update ended, but only by a few weeks - pic was shot in May 2016. This 2-part forum update covers work completed from January through April 2016. I'm writing these updates pretty fast and furious, but still trying to avoid mistakes like I had made time (see my 'mea culpa', below). There is lot to cover, so let's get started where we left off last time - the front end.

MORE FRONT SPLITTER & VALENCE WORK

This front/splitter section is the "business end" of this Camaro, and a place where a considerable number of hours have been spent getting both the aero and aesthetics "right". Last time I showed some of the fabrication work on the dual plane aluminum front splitter and valance.


The lower valance panel (above) was based on an OEM piece but stamped in aluminum. It had to be heavily modified to incorporate the lower grill openings and cooler inlets for both the oil and p/s coolers as well as brake cooler inlet ducting. This modified panel and the custom parts below were both tack welded and now needed lots of final welding, sanding, and finish work.


The front splitter assembly was built in stages and the lower valance and cooler inlets are joined together above and below the upper splitter plane. Almost everything here is made in aluminum and bolts together with discretely placed hardware, including the canard sections shown below.


These canards will help direct air spilling off the upper plane where we want, and complete the "lines" of the splitter. Admittedly these parts are part downforce, part styling, but without dozens of hours in a wind tunnel I cannot tell you if these are perfected or not - but this ain't an F1 car. We will do some aero tests in our initial track testing with the customer, of course.


Ryan spent hours and hours final welding the initially tacked aluminum structures of the lower valance and grill openings.


Then he spent hours and hours grinding, sanding, welding, and sanding some more. These components are 100% metal worked, no bondo or putty tricks.


Yes, if there is a major crash it will take work to repair. But so would any custom metal creation built by any other shop. Does it make sense to pull molds off of these finished parts to make "easier to replace" composites? Mold making and composite work is not our specialty, but I have asked others who specialty this is - and they say "expensive". Such is the way of custom car building.

FUEL CELL + MOUNTING

After discussions with the customer about safety, we decided to move from an aftermarket fuel tank to a proper fuel cell. This had a lot to do with the projected track speed and capabilities this car will have, and the customer wanted a SAFE car in the end. A fuel cell also just fits a build of this scale and magnitude.


Ryan mapped out the space allocated for the cell and we ordered this custom aluminum ATL cell can and bladder. This was spec'd with the internal surge tank and pumps for ease of plumbing. The surge tank is crucial to keep the fuel pump inlet submerged at all times, even at low fuel levels and 1.5 g or higher loads.

continued below
Reply With Quote
  #99  
Old 12-03-2016, 02:47 PM
Fair Fair is offline
Senior Member
 
Join Date: Mar 2014
Location: Plano, TX
Posts: 160
Thanks: 6
Thanked 67 Times in 33 Posts
Default

continued from above


After waiting a number of weeks, the fuel cell was built and shipped to us at "Vorshilang", then we began discussing rear diffuser shapes and placement of the cell with the owner.


Ryan then laid out this fuel cell "cage" that he built out of square tubing. This will act as both a stable mount and a protective structure for the fuel cell. He even custom machined threaded bungs that are welded into the upper perimeter of the "fuel cell cage" which the upper lid of the fuel cell bolts into.


The fuel cell "cage" and the cell were both then installed into the trunk area between the frame rails. The lower valance panel even ties into this structure, replacing the structure normally in the spare tire well and factory trunk floor.


Gratuitous underskirt shot... 345mm Hoosiers are BIG.

BODY REMOVED & CHASSIS WELDED

After the fuel cell was added the body was removed from the chassis, which was still tack welded to the welding table.


Removing the body was fairly easy, and involved cutting a few tack welds, then 4 people to spread and lift the flimsy shell off of the chassis and around the cage.


The scooped out section of unibody above is all that was left of the original 1969 Camaro, and of that the rear fenders & taillight panel had already been replaced with new steel. The roof was looking pretty sketchy but we left it to our paint & body experts to tell us what else needed to be replaced.


After some minor work on the nearly-finished chassis while it was on the table, it was time to break it all down. The wheels, brakes and suspension came off. Then the drivetrain was removed and the the Ford 9" dropped out of the back. Last the seat, steering column, and coolers came out.


With all of the geometry of the frame components checked and rechecked, and now everything out of the way, many hours were spent final welding the main chassis and cage. First Ryan started welding with the chassis still on the table (above).

continued below
Reply With Quote
  #100  
Old 12-03-2016, 02:52 PM
Fair Fair is offline
Senior Member
 
Join Date: Mar 2014
Location: Plano, TX
Posts: 160
Thanks: 6
Thanked 67 Times in 33 Posts
Default

continued from above


Then the chassis came off the table and he spent more hours welding, grinding, and finishing the bare chassis. It was both light and rigid enough to move around on its side to get to all of the hard-to-reach places, to finish weld every joint without having to do overhead welding on your back (which is hard).


The main chassis was then weighed. I mean come on, its Vorshlag - you would expect this. We will show the merged body-chassis weight in the next forum update. Speaking of weights, I need to right a wrong...

FACT CHECKING MY POSTS - MEA CULPA!

I've been doing forum write-ups like this for 16+ years, and have been fanatic about keeping my posts as factual and honest as humanly possible. I have also been a freak about weighing automotive components for over 20 years, and had an extensive "weights page" on my first automotive website starting in 1996. This was full of weight data, pictures of parts on digital scales, etc. So much "bad tech" about weights gets thrown around on the interwebs that it makes me a little nuts about "fixing the internet" wrongs sometimes.


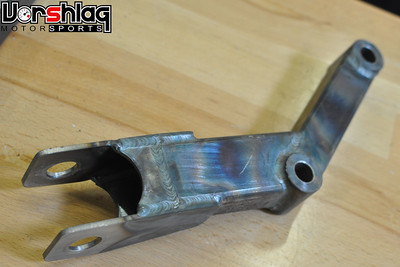
In my previous update to this thread I mentioned something that was "non-factual" about the replacement tubular steering arms. Ryan built these to replace the solid steel units that came on the car (which were heavier, had some sketchy welds, and incorrect bump steer geometry for the steering rack we chose). I felt them both in my hands, spit-balled a number, and actually wrote "these new steering arms save 12 pounds." Oh boy, I'm now well on my way to becoming a politician.


Of course several of you sharp eyed readers called my bluff, and I had to go weigh these parts. Then eat some crow when proven wrong. I "eyeballed" the weights and threw out a number that was nonsense. I thought I remembered weighing these arms, but I "mis-remembered" that fact. These tubular steering arms saved all of 1.8 pounds for the pair, not 12 pounds. So this is me admitting my mistake, showing the proof, and promising to try to never making that kind of error again. I'm sorry folks! #NotFakeNews

UNIBODY THEN CHASSIS BLASTED, REPAIRED, PRIMED AND PARTIALLY PAINTED

Our crew reassembled the naked Camaro chassis with the drivetrain, wheels, and suspension for the next phase of work. It would also look more presentable for our 2016 Open House we had on Feb 27th. Lots of people came to this event to see the shop, eat the food, get their free SCCA annual tech.... but many said they came just to see the Camaro. It was "naked and afraid" but didn't disappoint.


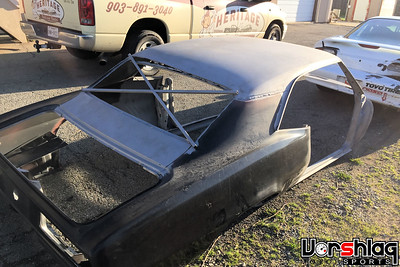
Meanwhile I had delivered the unibody to our paint and body experts at Heritage in Sherman, Texas. I am usually delivering or picking up cars there a couple of times a month.


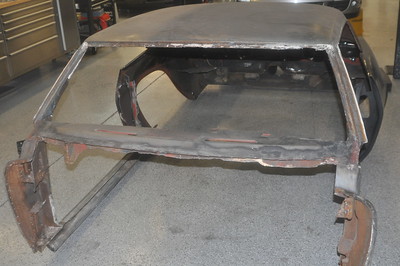
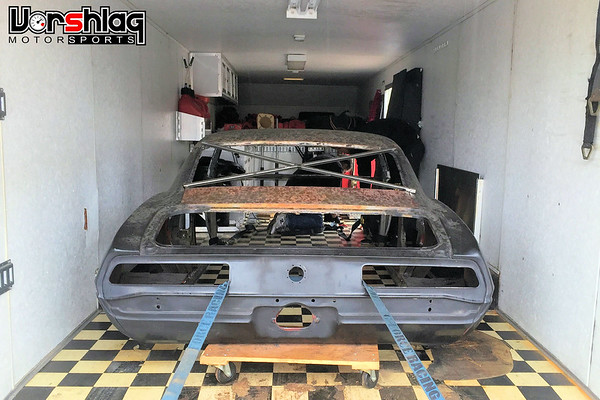
With the unibody sculpted down to the bare minimum needed there were now exposed areas that were pretty rusty. Some of these are normally not painted when the car was built, so that's to be expected. The underside of the roof was pretty nasty, with headliner residue and some light rust. Other sections were clearly rusted and needed replacement. Of course it was raining when we loaded the semi-bare metal tub into our trailer...


Sadly we never weighed the stripped unibody, but two people could move it easily. I took the pictures below at Heritage after the body had been bead blasted on all of the sections I asked them to (everything but the rear fenders), but before any primer or paint went back on. This car will be painted in 2 stages - some sections that the cage/frame cover up on the unibody needed final paint now.


They left the E-coat on the new rear fenders and tail panel, but everything else that was original steel was mostly in raw steel form, from work done by a previous shop who blasted some sections. Heritage concentrated heavier blasting around some areas on the tub that had a bit of "tin worm" or which had visible body filler - like on the front and rear window frames and A-pillars.

continued below

Last edited by Fair; 12-03-2016 at 02:59 PM.
Reply With Quote
Reply


Posting Rules
You may not post new threads
You may not post replies
You may not post attachments
You may not edit your posts

BB code is On
Smilies are On
[IMG] code is On
HTML code is Off

Forum Jump


All times are GMT -5. The time now is 05:22 PM.


Powered by vBulletin® Version 3.8.11
Copyright ©2000 - 2024, vBulletin Solutions Inc.
Copyright Lateral-g.net